Monday, December 29, 2014

My $1 Paisley Georgian Stays

My $1 Dollar Paisley Georgian Stays... 

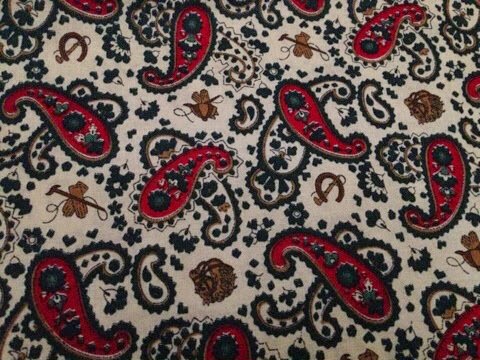
Okay, so all the materials didn't cost $1 buck but the main material was a $1 find at our local Goodwill!


Lovely Paisley- Do you see the riding crops and gloves??


J.P. Ryan Stays Pattern laid out and partially cut.
I used 2 layers of linen, the fashion fabric and a layer of muslin for the lining. 
Almost completed stays (I added the straps).


Instead of using reeds for boning in the channels; as was customary at the time I used zip ties specially two - 15' inch fifty count packages from Big Lots for a total of $5 dollars.  I also purchased the grosgrain ribbon for the edges and some maroon roping, spent about $3 on those items. 

Grand Total = $9.

The lining was some stash fabric.

Don't mind my chemise... I couldn't find my Georgian chemise so I put on my regency chemise...


The eyelets are handbound. 

 I like it but I think I need to make another pair and add a inch or two to the waist. I also will probably make them front lacing cause 'dear hubby' does not like spiral lacing and I almost had a 'fit' trying to get out of them!!


Until later Toodles!! 

Sunday, December 28, 2014

1860's and Still Handsewn...A Very Late Post!!!

At Costume College this year I took an amazing class with two living history historians from Colonial Williamsburg; Janae Whitcare and Emma Cross, master seamstress and apprentice from the Mantua Shoppe at Colonial Williamsburg

We draped a 1860's bodice taken from a gown they recently located and studied. 

Although The Mantua Shoppe of Colonial Williamsburg doesn't venture into the 19th century often, apparently every once in awhile they have an event that calls for Victorian wear.

~~~~~~

Many people are under the assumption that with the advent of cotton gins and the sewing machine that everyone sewed their clothing on a sewing machine. In actuality it wasn't until much later on when the creation of sewing machine loans (payment plans, etc) that sewing machines in every home became more common place.

The dress Janae studied is taken from the mid 1860's and was still handsewn.

We were taught the various stitches found on the gown and how to put in together by hand in a period correct manner.

 A mosmosh of stitches...
 Running stitch.

Running stitch and button hole.

Combining running stitch, ruffles and piping.

Shot of the back.

Piping done on some yarn.


Please understand that this is a work in progress and could possible take me a whole year to complete!!

But I wanted you to see the amazing detail on the reproductions Janae and Emma made and show you the fabric for my dress. (I am very tempted to cheat and sew it up real quick on my machine BUT I won't!!!!)

Anyway, my lovely table partner at this workshop was Katherine and she helped fit my bodice over my corset (apparently depending on the way it was made you can wear this without a corset and multiple petticoats).


And a shot or two of my fabric.


Now the amazing detail on Janae's dress.

Piping on the armsyce.


Hidden Center Front Placket and Wrist band and Ruffles


Gingham used for the hem with a slight over hang.


And this cute lil hat!


Apparently this hat was all the rage around this time.
Regular size hat with doll hat inserted in the center.
Velvet ribbon "x" spaced out on top and a ribbon on bottom to tie to on to your head! 

Easy peasy!!

As my handsewing progresses I'll post updates :)

Until later ...


Tuesday, December 23, 2014

A Huge Faux Fur Muff, Of Course-Part Deux

So upon searching the internet I came across Katherine from The Fashionable Past tutorial on a removable muff cover!

Awesome!!!

But would it work with fur?

The satin/silk she worked with made it easier to create channels that you could pull a ribbon through. So my brainstorming session was reactivated.

A plan was devised!!! 
Muahhhh hahhahahahahaha (maniacal laugh for those who weren't sure what was going on)...

Materials:
1/2 bag polyester fiberfill
1.5 yards cotton or muslin 
3/4 - 1 yard faux fur
3 yards ribbon
1 package of double wide bias tape
Bodkin/large safety pin


So I cut out my cotton for the muff base.
29 x 21 inches doubled (cut on fold/ I eventually cut off the folded edge).
So in actuality it was 58 x 42.
I wanted a pocket to put my cell phone securely in, so I measured my cell and cut out the corresponding rectangle.
Pocket top, not trying to be fancy....
Pinned everything down and sewed it to one side of my lining (lay your muff body on your table how you would hold it- place your pocket- pin corners and stitch). Add a button hole and button.
Place the two pieces on top of each other with the pocket on the inside. Making sure that when you turn the pieces inside out that the pocket faces/opens in the correct direction.

Sew one side of the 21 inch ends to create a large panel (not pictured).


Fold that panel in half (longest length) and sew down the side. Creating a long 56 inch tube. (Above)
Turn the tube inside out. Iron
Flip the tube so the pocket is on the inside right side up.
My Goodwill find for $1.99. Slowly begin to stuff the tube. I did this layer by layer. 2-3 inches around another 2-3 inches around until I got the desired thickness. Pat and roll the tube to distribute it evenly.
Slowly fold in your edges and pin all around top of your tube. Whipstitch this closed.
Measuring for the fashion fabric. Or Faux fur in this case. Make sure to add a inch in either direction for seams.


My Black Faux Fur that has waited patiently for over ten years to be used. My piece ended up being 21x 28.
Using black bias tape extra wide double fold. I ironed one side semi flat.  I still wanted to see crease to stitch in the ditch.
Pinning every 2 inches or so I sewed the bias tape onto my fabric (both 28 inch sides). Bias tape to fur side of fabric. Make sure to stop the bias tape at least an inch before the fabric end. This will give you room for your final seam and allow you to insert your tightening Ribbon ties into the bias tape channels.
Turn over -iron.
Turn to the inside and pin to the inside of the fur.  Securely whipstitch the bias tape to the wrong side of the faux fur. Make sure the ends are nice and strong.
Fold fur in half (fur to fur or fashion fabric to fashion fabric) and stitch down the side. Make sure you do not catch the bias tape channels!


Tada!!

Turn inside out and using a large blunt needle/bodkin/safety pin thread your ribbon through the bias tape channel.

I unfortunately did not have any black ribbon so for now I used some brown ribbon that I have loads of!

Go slow and pull gently to work it through the channel.

Once finished, gently pull the ribbon to create your finished muff!

Fin!

I'm in my 19th century underthings but with my 18th century red cape. I know, I know!! But as I started to get dressed I realized most of my mid Victorian wear is very dark and the muff would be hard to see.


In the works I have a matching red flocked velvet cape with black trim.

Sneak peek!!!

But more about that later....


Hope this helps and its understandable!

P.s. Because of the ease of making this I will eventually make a lavender taffeta version to go with my gown worn at Costume College 2014.
 I have a day bodice made up and a white velvet Talma in the brainstorming stage!!

Monday, December 22, 2014

A Huge Muff Of Course, Part One


So I've had this faux fur fabric FOREVER!

I attempted to make a muff in the beginning of my sewing adventures but it came out less then stellar.... I mean it was BAD!!!
stamp courtesy of : http://classic.meez.com/community.dm?furl=http%3A//forums.meez.com/forums/showthread.php%3Ft%3D1256716
Fast Forward 10+ years.

Yes, I don't need a muff in Arizona weather but it was too pretty to pass up.
Plus I'm on an accessories kick for all my costumes.

While researching period outerwear for another planned accessory, I kept coming across these gorgeous muffs on Pinterest.

Small (ca. 1860's)


Medium  (ca. 1880's)


Large (I think this one was ca. 1890's)


Huge  (ca. 1890's)


Humongous   (ca. 1810's-20's)


And Finally Ginormous or it could be the other way around!! That regency muff is huge compared to the model!


Anyway, I really wanted to use my faux fur.  

But I felt that a muff that large out of fur would be a lot of work for an accessory I wouldn't use often. 

So the brainstorming began! 

Plan of action formulated!

To be continued....
Da-da-da