Showing posts with label reenact. Show all posts

Monday, December 29, 2014

My $1 Paisley Georgian Stays

My $1 Dollar Paisley Georgian Stays... 

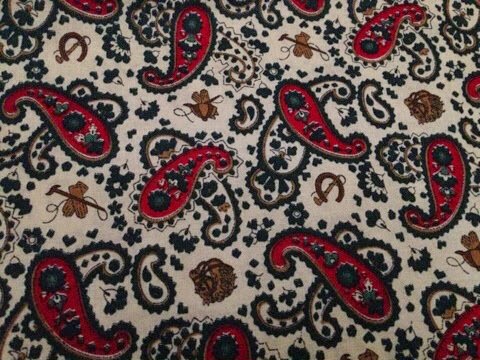
Okay, so all the materials didn't cost $1 buck but the main material was a $1 find at our local Goodwill!


Lovely Paisley- Do you see the riding crops and gloves??


J.P. Ryan Stays Pattern laid out and partially cut.
I used 2 layers of linen, the fashion fabric and a layer of muslin for the lining. 
Almost completed stays (I added the straps).


Instead of using reeds for boning in the channels; as was customary at the time I used zip ties specially two - 15' inch fifty count packages from Big Lots for a total of $5 dollars.  I also purchased the grosgrain ribbon for the edges and some maroon roping, spent about $3 on those items. 

Grand Total = $9.

The lining was some stash fabric.

Don't mind my chemise... I couldn't find my Georgian chemise so I put on my regency chemise...


The eyelets are handbound. 

 I like it but I think I need to make another pair and add a inch or two to the waist. I also will probably make them front lacing cause 'dear hubby' does not like spiral lacing and I almost had a 'fit' trying to get out of them!!


Until later Toodles!! 

Monday, September 22, 2014

A 'Lil Red Riding Hood' for 'Lil Bit'

So, after completing a Ladies Jacket and Anglaise Gown for myself I had some yardage left over. 

What to do! 

Make 'lil bit' a outfit!!!! 

So I started searching the MET, Pinterest and one of my Colonial Williamsburg books. 

And I found these pictures...

Embroidered Linen Dress 18th C. Front
Back of Embroidered Linen Dress


Glazed Cotton Dress 18th C. 


 After finagling the remaining pieces of fabric I was able to work out the shape needed. 

What pattern did I use??? 

Why my 'Lil Bit', of course!!! When she woke up this morning after hugs, kisses, and some juice to start her day; she gladly obliged to my request to lay down on mommy's fabric. I simply traced her body out making sure to keep her arms straight out. 

From studying and enlarging the pictures researched, several things became apparent; 1) there were no front princess or waist seams, 2) the sleeves were not separate pieces, 3) there were only side seams, a somewhat pleated side and back at the waist area. 

Unfortunately,  I did not have enough fabric to make all the pleats in the skirt so I simplified my dress. I cut the back a tad too wide and made a box pleat at the top neck and ended it about waist length.


I rolled the neck hem and slip stitched it down.
The front and hem are folded twice and slip stitched as well. I wanted to be able to simply un-hem the front or hem to add extra width/length if she needed it.

On the extant dress and the descriptions provided with them, no obvious closures are discussed. Since I do want to be able to let out the gown I don't want anything to permanent and I didn't want to use pins. (Too dangerous for a toddler). So I will probably be adding some type of threaded loops with ribbon to laced down and close it at center front. 

With the dress 90% done I couldn't leave her with out her outerwear!


So I quickly cut a cape out of some red wool remnants.

Again, fabric was limited so the front panels are a little skinny.

The hood is lined with some white taffeta I found in my scrap bin.

The casing for the ribbon ties is bias tape, which has been stitched to the top inside selvage edge and slip stitched down.

I also used bias tape to hem the bottom. 


Here's a picture of 'lil bit' running away cause she didn't want to try on the cape.....

She's quick!! 


Hopefully, I can find some linen in my stash to make a bonnet and a petticoat or chemise to go with the outfit. 

Then we can take a picture of it all together!!


Monday, September 15, 2014

I Finished a Book!

Why is this such an accomplishment??
Because being a mom to an infant/toddler is hard work.
 'Lil bit' is a mover and a shaker, always running around and getting into things.
Being a SAHM isn't easy and unfortunately, me sitting on the couch and eating bon bons and watching the soaps is not an option.
So for me, it is a major accomplishment for me at this time to read and FINISH a book. 
(I used to read a book a week for my graduate classes and for recreational reading I could read a 300-500 page book in a day!)

Anyway so here it goes.... 

I thoroughly enjoyed this book even though at times I was annoyed by Sarah's almost judgmental attitude toward those she thought were judging her (I hope that made sense!). It seemed at times that Sarah assumed everyone was out to get her because she wore a corset. Yet and still it was a refreshing view of a modern girl whose views of corset wearing, changes dramatically over the course of several years. Sarah is able to create a world for herself where she feels beautiful and ultimately a place she feels she belongs and feels comfortable in time. Even with her dramatic change, she is at times rather opinionated about other costumers who use less than perfect fabrics and historically inaccurate costumes for their reenacting. Truth be told I too, cringe at some obviously horrifically inaccurate costumers as well, but I tend to say  'live and let live', if their having fun and hurting no one...so be it! 

Anyway, Sarah's transformation was interesting to read, but several times throughout the book I was in wonderment that she omits an integral part of Victorian wear, a chemise. A chemise was worn between the body and corset to keep sweat from dirtying up your corset (which is difficult to wash, unless you have an removable lining). It also stops you (for the most part) from having the 'angry red criss cross marks' on your back, where you lacing dug into your skin. Other then this major omission Sarah relates a very interesting and humorous journey.

Sarah Chrisman's Before & After


To costumers, corset wearers and the novice clothing historians this would be an interesting read. 

Toodles !