Showing posts with label Georgian. Show all posts

Monday, December 29, 2014

My $1 Paisley Georgian Stays

My $1 Dollar Paisley Georgian Stays... 

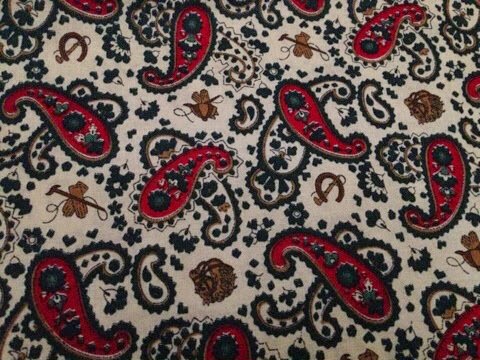
Okay, so all the materials didn't cost $1 buck but the main material was a $1 find at our local Goodwill!


Lovely Paisley- Do you see the riding crops and gloves??


J.P. Ryan Stays Pattern laid out and partially cut.
I used 2 layers of linen, the fashion fabric and a layer of muslin for the lining. 
Almost completed stays (I added the straps).


Instead of using reeds for boning in the channels; as was customary at the time I used zip ties specially two - 15' inch fifty count packages from Big Lots for a total of $5 dollars.  I also purchased the grosgrain ribbon for the edges and some maroon roping, spent about $3 on those items. 

Grand Total = $9.

The lining was some stash fabric.

Don't mind my chemise... I couldn't find my Georgian chemise so I put on my regency chemise...


The eyelets are handbound. 

 I like it but I think I need to make another pair and add a inch or two to the waist. I also will probably make them front lacing cause 'dear hubby' does not like spiral lacing and I almost had a 'fit' trying to get out of them!!


Until later Toodles!! 

Thursday, December 18, 2014

Organizing My Fabric Stash and Projects

So I have tons of projects I want to create...

But its so hard especially without having a dedicated room to craft/sew. 

I am relegated to a corner of the den.

Unfortunately, that also means that 'lil bit' can (if she's being especially Indiana Jones like) climb over the rubber maid tote wall I placed in her path to keep her away from the many dangerous sewing implements I tend to use.... scissors, straight pins, irons...

So I have had to come up with a crafty (get it??? haha) way to keep her safe and my projects organized and in their place.

Besides being a "bin hoarder' as my dear husband calls me, I tend to try and group my projects and all their accoutrements in a bag (zip lock, reusable totes, homemade bags).

So I take the fabric, pattern, and any trims I will need and stuff it in a bag.

This keeps my project all in one place and helps me visualize my steps to complete the project.

It works most of the time unless I forget to update my pattern book (book with a picture and yardage list for each of the patterns I own). If that happens and I think of a new project I want to do, there might be a bit of panic as I think I misplaced, lost or did not buy a specific pattern!

Fool proof? 

No, but it works for me.

But, ohh what I would give for one of these!!!!

Fill it with baskets and place each project in its own cubby!!

Awesome sauce ! 


Monday, September 22, 2014

A 'Lil Red Riding Hood' for 'Lil Bit'

So, after completing a Ladies Jacket and Anglaise Gown for myself I had some yardage left over. 

What to do! 

Make 'lil bit' a outfit!!!! 

So I started searching the MET, Pinterest and one of my Colonial Williamsburg books. 

And I found these pictures...

Embroidered Linen Dress 18th C. Front
Back of Embroidered Linen Dress


Glazed Cotton Dress 18th C. 


 After finagling the remaining pieces of fabric I was able to work out the shape needed. 

What pattern did I use??? 

Why my 'Lil Bit', of course!!! When she woke up this morning after hugs, kisses, and some juice to start her day; she gladly obliged to my request to lay down on mommy's fabric. I simply traced her body out making sure to keep her arms straight out. 

From studying and enlarging the pictures researched, several things became apparent; 1) there were no front princess or waist seams, 2) the sleeves were not separate pieces, 3) there were only side seams, a somewhat pleated side and back at the waist area. 

Unfortunately,  I did not have enough fabric to make all the pleats in the skirt so I simplified my dress. I cut the back a tad too wide and made a box pleat at the top neck and ended it about waist length.


I rolled the neck hem and slip stitched it down.
The front and hem are folded twice and slip stitched as well. I wanted to be able to simply un-hem the front or hem to add extra width/length if she needed it.

On the extant dress and the descriptions provided with them, no obvious closures are discussed. Since I do want to be able to let out the gown I don't want anything to permanent and I didn't want to use pins. (Too dangerous for a toddler). So I will probably be adding some type of threaded loops with ribbon to laced down and close it at center front. 

With the dress 90% done I couldn't leave her with out her outerwear!


So I quickly cut a cape out of some red wool remnants.

Again, fabric was limited so the front panels are a little skinny.

The hood is lined with some white taffeta I found in my scrap bin.

The casing for the ribbon ties is bias tape, which has been stitched to the top inside selvage edge and slip stitched down.

I also used bias tape to hem the bottom. 


Here's a picture of 'lil bit' running away cause she didn't want to try on the cape.....

She's quick!! 


Hopefully, I can find some linen in my stash to make a bonnet and a petticoat or chemise to go with the outfit. 

Then we can take a picture of it all together!!